When people imagine a heated floor, they picture the warmth and the finished tile. What they almost never picture is the thin membrane sitting between the subfloor and everything above it. That membrane gets no attention, no admiration, and no space in the daydream. Yet it’s the single component that most often determines whether a heated floor lasts for decades or cracks within a couple of winters.
I’ve seen heated floor projects fail, and the failures rarely trace back to the heating cable itself. They trace back to what the cable was installed on and how movement was managed. So let’s give the underfloor heating membrane the attention it deserves, because understanding it changes how you plan the whole floor.
Understand what the membrane actually does
The membrane’s job is easy to state and easy to underestimate: it manages movement. Here’s the conflict it resolves. A wood subfloor expands, contracts and flexes with humidity and seasonal change. Tile, by contrast, is rigid and hates movement. Bond tile directly to a subfloor that shifts, and the tile loses. It cracks, or its grout lines fracture.
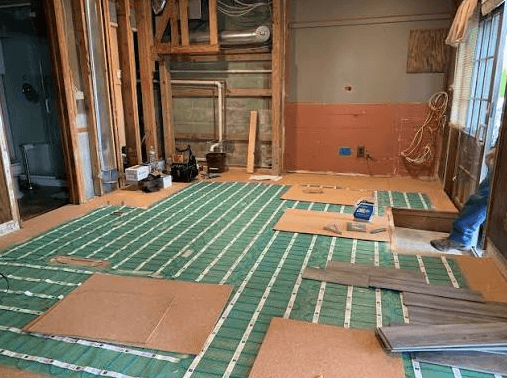
An underfloor heating membrane sits between these two enemies and decouples them. Its structure, often a polyethylene sheet with a dimpled or waffled surface, allows the subfloor beneath to move independently of the tile above. The movement gets absorbed in the membrane layer and never reaches the ceramic. This is why the same product is often called a decoupling membrane. Decoupling is the whole point.
Add a heated cable to the equation and the stakes rise. Heat means expansion and contraction cycles, more movement, more stress. Without a membrane to manage it, a heated floor is arguably more prone to cracking than an unheated one, not less.
Recognize the double duty it performs
Beyond decoupling, a good membrane earns its place two more ways. First, it holds the heating cable. The dimpled surface cradles the cable in its channels, keeping it evenly spaced and correctly positioned without the need for separate clips or mats. That even spacing matters for consistent warmth across the floor.
Second, many membranes provide waterproofing and vapour management. In a bathroom, this is a serious advantage. The membrane adds a layer of protection against moisture reaching the subfloor, which is exactly what you want in a wet, heated room. Choosing the right underfloor heating membrane means weighing these functions together, since thickness, cable compatibility and waterproofing capability vary between products and rooms.
The market leader here is Schluter, whose systems became something of an industry reference precisely because they combine decoupling, cable management and waterproofing in one product. But whatever brand you choose, those three functions are what you’re really paying for.
See also: How Professional Movers Help Protect Your Valuable Belongings
Respect the layer beneath the membrane
Here’s a hard truth: the best membrane in the world can’t save a bad subfloor. Decoupling manages normal movement, not structural inadequacy. If the subfloor flexes excessively because the joists are undersized or the sheathing is too thin, the whole assembly is compromised, membrane or not.
So the first job in any heated tile floor is ensuring the subfloor is stiff enough. Deflection, the technical term for how much a floor bends under load, has to stay within limits or rigid tile will fail. This step happens before the membrane goes down, and skipping it undermines everything above. Think of the membrane as managing the small, inevitable movements, while a solid subfloor prevents the large, destructive ones.
Getting this order right, subfloor first, then membrane, then cable, then tile, is the backbone of a floor that lasts.
Plan the cable layout deliberately
Since the membrane holds the cable, this is the moment to think about where heat actually needs to go. A common mistake is running heating cable across the entire floor uniformly, including under fixed elements. There’s no benefit to heating the floor beneath a vanity, a bathtub, or a permanent cabinet, and in some cases it can even cause the cable to overheat where it can’t dissipate.
Map the cable to the zones where people stand and walk. In a bathroom, that’s the area in front of the sink, the toilet and the shower, not the footprint of the fixtures. Thoughtful layout uses less cable, costs less to run, and directs warmth where feet actually meet the floor. The membrane makes this planning tangible, since you’re placing the cable into a physical grid you can see and adjust before anything is locked in.
Match the membrane to the room
Not all membranes are interchangeable, and choosing the right one for the specific room prevents both overspending and underperformance. The variables worth weighing are thickness, waterproofing capability and compatibility with your chosen heating cable.
Thickness affects both the decoupling performance and the finished floor height. A thicker membrane manages movement well but raises the floor, which can matter at doorways and transitions where a sudden step is undesirable. In a bathroom, where moisture is constant, the waterproofing rating climbs the priority list. In a dry entryway, decoupling and cable management lead, and full waterproofing may be less critical.
Cable compatibility is the technical detail that trips people up. The membrane’s channels or studs have to accept the gauge of cable you’re using, and the two are often designed to work as a system. Mixing a membrane and cable that weren’t meant for each other leads to poor spacing and installation headaches. Choosing them together, ideally from a compatible product line, avoids this entirely.
Taking a few minutes to match these variables to the actual room, rather than grabbing whatever’s on hand, is the kind of small upfront decision that pays off in a floor that performs exactly as intended for years.
Time it right or pay dearly
The final principle is about timing, and it’s where budget and regret meet. A heated floor is far cheaper to install as part of a planned tile project than to add later. Retrofitting means tearing out an existing floor to reach the subfloor, essentially paying for the demolition and the reinstall on top of the heating.
If there’s any chance you’ll want a heated floor in a room, the moment to decide is before the tile goes down, not after. Installing the membrane and cable during a renovation you’re already doing adds a reasonable incremental cost. Coming back to it afterward multiplies that cost several times over. The membrane is inexpensive relative to the floor it protects and the comfort it enables, which makes cutting it to save money one of the poorer trades in a renovation.
None of this is glamorous. Nobody shows off their decoupling membrane. But it’s the quiet layer that decides whether the warm, crack-free floor you imagined is the floor you actually get. Respect it in the planning, and it will do its unseen work for decades without ever asking to be noticed.